
In this case, we are going to use build a RESTful Web Service in Java using Jersey. But, what is Jersey? According to Jersey website (https://jersey.java.net/):
Goals of Jersey project can be summarized in the following points:
- Track the JAX-RS API and provide regular releases of production quality Reference Implementations that ships with GlassFish;
- Provide APIs to extend Jersey & Build a community of users and developers; and finally
- Make it easy to build RESTful Web services utilising Java and the Java Virtual Machine."
For this exercise we are going to use:
- Java 1.7
- Tomcat 7
- Jersey
- Eclipse IDE
Open Eclipse and create a Web Dynamic Project. Let's name the project JAX-RS-Jersey. We don't need to create an EAR to our project, so unselect that option.

then, click next and on Web Module screen, select "Generate web.xml deployment descriptor" option

Then, we need to place Jersey .jars in: Webcontent/WEB-INF/lib folder. You can get them @ https://jersey.java.net/ . Also I'll include all these files in my GitHub account, I'll explain at the end of this tutorial. Your workspace should show you the jars. If you don't see them, refresh the project

In Eclipse, go to Java Resources folder, right click on "src" and add a new package, let's name it: com.rolandoFebrero.rest (you can change these names to anything you want, this is a free country, don't worry). Now, create a new class inside that package: Hello.java
Again, create another package com.rolandoFebrero.restclient and inside that, create another java class, let's name it ClientTest.java. Your workspace should look like this:

In Hello.java, paste this code:
package com.rolandoFebrero.rest;

/**
 * Created by: Carlos Rolando Febrero
 *
 */

import javax.ws.rs.GET;
import javax.ws.rs.Path;
import javax.ws.rs.Produces;
import javax.ws.rs.core.MediaType;
@Path("/hello")
public class Hello {
  @GET
  @Produces(MediaType.TEXT_PLAIN)
  public String sayPlainTextHello() {
    return "Hello there, RESTfull service with Jersey (plain)";
  }
  // This method is called if XML is request
  @GET
  @Produces(MediaType.TEXT_XML)
  public String sayXMLHello() {
    return "<?xml version=\"1.0\"?>" + "<hello> Hello there, RESTfull service with Jersey (xml)" + "</hello>";
  }

  // This method is called if HTML is request
  @GET
  @Produces(MediaType.TEXT_HTML)
  public String sayHtmlHello() {
    return "<html> " + "<title>" + "Hello Jersey" + "</title>"
        + "<body><h1>" + "Hello there, RESTfull service with Jersey (html)" + "</h1></body>" + "</html> ";
  }

}
In ClientTest.java, paste this code:
package com.rolandoFebrero.restClient;

/**
 * Created by: Carlos Rolando Febrero
 *
 */

import java.net.URI;
import javax.ws.rs.client.Client;
import javax.ws.rs.client.ClientBuilder;
import javax.ws.rs.client.WebTarget;
import javax.ws.rs.core.MediaType;
import javax.ws.rs.core.UriBuilder;
import org.glassfish.jersey.client.ClientConfig;

public class ClientTest {
  public static void main(String[] args) {
    ClientConfig config = new ClientConfig();
    Client client = ClientBuilder.newClient(config);
    WebTarget target = client.target(getBaseURI());

    System.out.println(target.path("rest").path("hello").request().accept(MediaType.TEXT_PLAIN).get(String.class));
    System.out.println(target.path("rest").path("hello").request().accept(MediaType.TEXT_XML).get(String.class));
    System.out.println(target.path("rest").path("hello").request().accept(MediaType.TEXT_HTML).get(String.class));
  }

  private static URI getBaseURI() {
    return UriBuilder.fromUri("http://localhost:8080/restfuljersey").build();
  }
}
In web.xml paste this code:
<?xml version="1.0" encoding="UTF-8"?>
<web-app xmlns:xsi="http://www.w3.org/2001/XMLSchema-instance" xmlns="http://java.sun.com/xml/ns/javaee" xsi:schemaLocation="http://java.sun.com/xml/ns/javaee http://java.sun.com/xml/ns/javaee/web-app_3_0.xsd" id="WebApp_ID" version="3.0">
 <servlet>
    <servlet-name>Jersey REST Service</servlet-name>
    <servlet-class>org.glassfish.jersey.servlet.ServletContainer</servlet-class>
     <init-param>
        <param-name>jersey.config.server.provider.packages</param-name>
        <param-value>com.rolandoFebrero.rest</param-value>
    </init-param>
    <load-on-startup>1</load-on-startup>
  </servlet>
  <servlet-mapping>
    <servlet-name>Jersey REST Service</servlet-name>
    <url-pattern>/rest/*</url-pattern>
  </servlet-mapping>
</web-app>
Now, let's add Tomcat server to our workspace. Click in Server tab and add a new server...


Select Apache Tomcat server:


Select you Tomcat path and click Finish:


Now, that you have added Tomcat, right click and start:

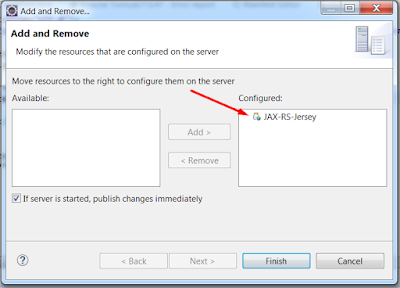
Go to Console tab and make sure there are no error, if so, deelete Tomcat and added it again. After that add our project to Tomcat and restart the server:
At this point, if everything is OK, you should be able to go to: http://localhost:8080/JAX-RS-Jersey/rest/hello
You'll get the following:

Want to download the code for this project?
go to my github account: https://github.com/rolando-febrero/JAX-RS-Jersey

Go to Console tab and make sure there are no error, if so, deelete Tomcat and added it again. After that add our project to Tomcat and restart the server:

At this point, if everything is OK, you should be able to go to: http://localhost:8080/JAX-RS-Jersey/rest/hello
You'll get the following:

Want to download the code for this project?
go to my github account: https://github.com/rolando-febrero/JAX-RS-Jersey
Programming thought of the day:
- Unix is user friendly. It’s just selective about who its friends are.


